| This is the finished invitation. |
| All the materials cut out and ready to assemble the invitation. |
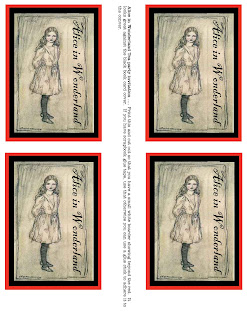
 This image to the left is what you print off, cut out and glue to the front book cover. Now you will need to paste the cute cover picture on the front of the black book card cover. Make sure to center it between the binding tape and the right hand edge of the black paper cover. I used white duct tape to look like binding and to cover up the staples, but I think I am going to go to the store and see if I can find some cute decorated duct tape instead of just a plain white duct tape binding.
  The next step is to print the inside pages 1 - 4. Cut them out. If you are going to make a lot of these invitations, I highly suggest you purchase a cutter, as it makes the cuts straight and looks so much better. Takes far less time than cutting out things by hand. Then collate the pages 1 - 4 and insert into the folded black card stock cover. Staple as close to the edge of the fold on the book cover as you can. Using a strip of duct tape, place over the staples and over fold so that it covers both the front and backside. (see the photo)
Now for the bookmark................... Print the bookmark page on white card stock. I just my card stock at Walmart in a ream, because it is firm enough for cards, but not too firm to give me problems running it through my printer. I wanted my bookmarks to be two sided. The black and white printed paper below I found at Shabby Princess Paper and printed it on the back side of my bookmark page. You might want it to just use solid black but either way it goes great with the invitation.
The next step is to cut out the bookmark, so that a boarder of black is showing all the way around and then punch a hole in the top. I then cut a piece of Red ribbon, folded it in half and threaded the folded side through the back to the front side of the punched hole, then put the two ends through the folded ribbon loop and pulled it tight. I slipped this completed bookmark in the center pages of the book with the ribbon hanging out. I was thinking that a black and white polka dot or checked ribbon would be really cute instead of the red, but red is what I have.
| Bookmark |
The paper below was designed by Shabby Princess and Sara Carling called "Dinner Party." The link to Shabby princess is: http://www.shabbyprincess.com/ At the Shabby Princess site, you need to stay for a while because she has great scrap booking products and offers a bunch of really nice looking ones for her blog visitors to use for free. Very, Very generous!!! Just click on "downloads" and a whole bunch of complete digital packs will be displayed and you will really be amazed at just how pretty her freebies are!!! I am using this paper as the backside of the book mark as well as the page before page one and after page 4... just because it looks nice and gives an extra page to make it look more like a vintage book. 
I just wanted to tell you why I include on the invitation the link found on page 4 to Project Gutenberg's site that has several Alice in Wonderland books, with different illustrators. I found out that the Young Women really love to read, and some of them read several books a week. I personally am not fond of the Alice in wonderland book, but it is a classic, and Project Gutenberg has spent countless hours digitizing so many wonderful classics (vintage books) for people to access and read online. We are trying to get the Youth to do productive things online instead of playing games, and just surfing the net, so I thought this would be a very worthwhile link to post on the invitation. I wonder how many parents know about Project Gutenberg? Here is the link to this wonderful site loaded with tons of free ebooks to read. http://www.gutenberg.org/wiki/Main_Page I love to pass on good tips, so take this one and pass it on to those you visit teach and give them a bookmark while you are at it.
I will be designing some place cards, and a Mad Hatter Hat favor in the next few days, so come back and I will have the templates and images of them as well.
Enjoy!
Katie G.
I just finished the name tags to be put on the table at the tea party and they turned out really cute as you can see in the picture. They are so easy, so not template for these. I have below this image the cute little tag that is hanging from the side of the favor box. This box I found at my local $ store for 8 of them only $1. They are pink. They will be filled with "English Toffee" and set by each table setting. This party is really going to be cute and fun. Oh the teapot that is behind my cute little printouts, is one that I purchased online because I wanted a very special and very cute one to have tea parties with my little Granddaughters. I think this one really fits the bill!
Enjoy!!! Katie G.
I just finished the name tags to be put on the table at the tea party and they turned out really cute as you can see in the picture. They are so easy, so not template for these. I have below this image the cute little tag that is hanging from the side of the favor box. This box I found at my local $ store for 8 of them only $1. They are pink. They will be filled with "English Toffee" and set by each table setting. This party is really going to be cute and fun. Oh the teapot that is behind my cute little printouts, is one that I purchased online because I wanted a very special and very cute one to have tea parties with my little Granddaughters. I think this one really fits the bill!
 P.S. So just when I think I am done creating things for this party, I remember the hostess wanted to have some 2 sided menus to be displayed on each table. So below is what I came up with. In keeping with the Alice in Wonderland theme, I named all the different foods, with names from the Story. It turned out pretty cute.


6 comments:
Hi, we are thinking in our ward of doing the same type of a party for the march birthday this year. we are still looking for a program tho. What did you do for your activity to go with the tea party?
This is a great Alice in Wonderland invitation idea. I printed each page but I thought you said you left them blank so they can be customized to our own saying, probably my mistake. They printed with the words on them. Please help me print them blank. I am havein a baby shower & would love to use your idea. Thanks & God Bless.
How do you enter your own info on the invite? Is there a download link somewhere??
How do you edit your own info? Is thee a download link somewhere?
please please please!! help me know how to customize the invitation.
please please please!! help me know how to customize the invitation.
Post a Comment